 Puppy puddle? Chips not strong enough to hold the salsa? Drippy pancake batter? I am constantly reaching for paper towels. Inevitably our recycling bin has it’s fair share of craft paper cylinders that make up the core of paper towels and toilet paper rolls.
For years my idea of repurposing the tubes was to use them as an amplifier and howl in them, driving my dogs crazy and earning an eye roll from my husband. However, recently I was struck with an idea. The curve of the cardboard would lend itself well to making paper flowers, hence this tutorial was born.
Sorry it is a little lengthy…
 Tools & Materials
- 1- paper towel roll core
- Scissors
- Button
- Paper glue
- Page of paper (can be recycled from an old book or magazine)
- Brown paper shopping bag
- 28 gauge wire (or wire that you can bend and manipulate that is heavy enough to hold up a paper flower)
- Wire cutters
- White craft paint (optional)
- Small paint brush (optional)
- Cut the paper towel roll lengthwise (fig. A).

- From the cut, measure 1” and mark. Cut off the 1” marked area (fig. B).

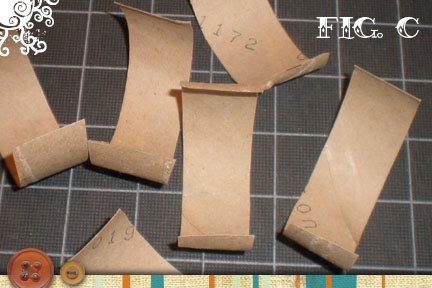
- Cut four strips from the roll anywhere between a .5” and .75” wide (fig. C).

- Take the remaining roll and measure, mark and cut 1.5” from one of the edges (similar instruction number two).
- Cut two strips from this roll approximately .5” wide.
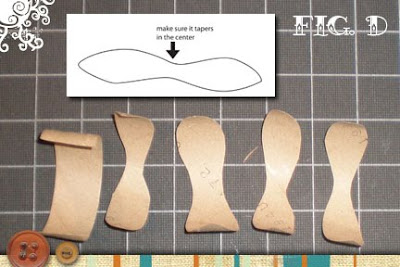
- Take the six strips and free form cut the petals similar to the shape shown in fig. D. These petals do not have to be exact, just make sure that the center tapers in.
- Glue two of the larger petals at 90° angles. Repeat with the remaining petals keeping the larger and smaller petals grouped together (fig. E).

- This step is optional! If you would like to add a bit of texture or color to your flower, take some craft paint and dry brush some paint on the tips of the petals. On the smaller group of petals I added some paint to the center also
- After the glue has dried, glue the groupings on top of each other, keeping the smaller petals for the top.
- Glue a button to the center of the flower (fig. F).

- From a piece of recycled paper use the pattern from fig. G to cut the calyx for the flower.

- Curl the ends of the calyx by wrapping them around a paint brush, pencil, etc.
- Take the wire and cut it double the length that you would like your stem. Fold the wire in half and twist together. Take one tip of the wire and bend it about a .25 at a 90° angle (fig. H1).

- Cut a strip or two from the brown paper bag. Starting at the straight end of the wire stem, glue the end of the paper to the wire and start to wrap the paper to cover the wire (fig. H2). Make sure to add a dab of glue here and there to keep the paper secure to the wire stem (fig. H3).. Stop wrapping short of the 90° bend.
* BEFORE CONTINUING TO THE NEXT STEP, please make sure the glue on the flower is completely dry. - Turn over flower and glue one of the calyx pieces to the bottom (fig. I). Let dry.

- Take the stem and glue the bend to the bottom of the flower by taking the second calyx piece and gluing it to the flower bottom sandwiching the metal bend between the calyx and the flower. It will be necessary to hold the wire in place until the glue dries (fig. J).


this is great! My only change would be to poke holes through all the layers (with an awl) and thread the wire through and around the button to secure it in place and create the stem <3
ReplyDeleteI love these, and have been needing a project just like this, to display some re-purposed bottle/vases I made-- thank you for the tutorial, and for the perfect timing!!
ReplyDeleteLovely! Thanks!
ReplyDeleteGood idea bean, I will have to invest in an awl.
ReplyDeleteGreat tutorial!!! I hope you don´t mind if a feature on my blog.
ReplyDeleteThanks for sharing
Hugs from Brazil
Olá flor,
ReplyDeleteAdorei o tutorial!!
Me tornei sua seguidora.
Que Deus lhes abençoe...abraços
http://ateliemagiartesanal.blogspot.com
Sorteio do blog...participe!!
Rosana, I would love for you to feature it on your blog! Thanks
ReplyDeleteParabéns pelo blog!!!
ReplyDeleteVou seguir!!
bjinho
TiTa
I like your creation of paper towel, that is beautiful paper flower.
ReplyDeletepaper towel dispenser
Oh, this is so good! I am going to give this one a try. I especially like the book page calyx....
ReplyDeletei have sooo many rolls as well! i have more toliet paper than paper towel rolls. This could possibly work on a smaller scale for them I am thinking. VERY AWESOME CRAFT!! can't wait to try it out. Thank you!!!!
ReplyDeletewonderful!
ReplyDeleteLoo rolls!!! we have loads in our house I'm sure I could adapt your pattern..
ReplyDeleteBrilliant! I love it! I'm going to be making a display of information about recycling and environmental issues at work, and I needed something to pretty it up... this fits the bill wonderfully! Thank you! :D
ReplyDeleteThese are so cute! I've made something similar for a blog challenge, but not as perfect as yours. You can check them out here:
ReplyDeletehttp://anzouyaspool.blogspot.com/2011/02/creation-of-day.htm
This is great, prettiest recycling project ever.
ReplyDeleteAbsolutely adorable! Putting together and article right now and linking to you...
ReplyDeleteTonya Lee
About.com Guide to Budget Decorating
www.budgetdecorating.about.com
Mi piacciono molto queste dalie e penso proprio che proverò a farle, grazie!
ReplyDeleteI glued some beautiful scrap booking paper to mine, before I cut them out. Then you can make some really cool ones!
ReplyDeleteGood idea
DeleteSaw this tutorial on pinterest and it's on my to do soon list. Thanks for sharing!
ReplyDeleteNice thought you have post i like that ..
ReplyDeleteFibre Drums
Drink half of the liquid with either water or juice, then fast for a couple of hours and then drink the next half again with either water or chase it with juice to cut down the salty flavor. Wait another two hours before you start drinking and eating again; and just like that, you are done. The last part of the plan is optional and can be omitted if you opt for a flush drink on test day. However, if you decide to take dietary fiber to be extra sure, prepare an hour before the test; combine the fiber with eight ounces of water, chug it down within a few minutes, wait for a while, and then follow up with sixteen ounces of water. After urinating a couple of times, you are set for the test. Keep in mind not to exceed fifteen pill dosages per day. Also, the results may vary for different people due to various conditions. This gives you options on how you want to get just the right temperature for your synthetic urine. However, the pack doesn’t contain any synthetic urine solutions; you’re going to have to purchase that separately. The good thing, though, is that the Clear Choice Practice Kit is compatible with other synthetic urine brands like Sub-Solution or Quick Luck. Pros • Accurate pH levels and urine contents • Comes with own heating strip • Very affordable price • Relatively long shelf life Cons • Not meant for beginners • Doesn’t come premixed Aside from being a great affordable option if you’re looking to pass that drug test on a budget, Test Clear’s powdered synthetic urine can go toe to toe with some of the other top brands in the industry. The fake piss contains what you’d expect from natural urine: accurate pH levels and the right consistency, natural compounds like urea and uric acid, and the heating strip ensures you get the right temp when you’re ready to hose down that cup during your test. And although it’s not premixed, which means newbies might find the process jarring, Test Clear provides clear instructions with their powdered pee kit to make sure that you use it correctly. Even better, its powdered composition means it has a longer shelf life compared to premixed urine, so you can stock this relatively longer for future use. If you are not an intensive THC consumer, then lemon can help you detoxify the small traces of the drug. It will not eliminate the drug but will dilute your urine if taken in sufficient amounts. Depending on the THC consumption and your digestive system’s acidic tolerance, take lemon juice diluted with an adequate amount of water every one to two hours. Mix a full tablespoon of lemon juice into 500 ml of water and drink it as much time as you feel comfortable. You must start this process at least a week before the scheduled drug test. It will effectively clean your urine from the THC content and is a natural remedy.
ReplyDelete